
CPM campaigns are ideal for online marketing strategies that focus on heightening brand awareness and delivering specific messages.
The CPM campaigns provide you with extra settings and reports specifically for reaching the right visitors. In addition, you can manually add the ad zones that you do consider as fit for your CPM campaign anytime you want.
This article explains how to set up your CPM (cost per mille) campaign.
Set up your CPM (cost per mille) campaign in a couple of minutes.
When setting up a CPM (cost per mille) campaign, you’ll also complete a 6-step process to add a creative and review your CPM campaign.
Next steps
- Basic ad campaign settings.
- Geo-targeting settings (optional).
- Traffic type filters (optional).
- Advanced targeting (optional).
- Ad zones.
- Add your creatives.
This article explains how to set up your first CPM (cost per mille) campaign.
Before you begin
Learn about the different campaign types and understand your ad campaign settings so you know after that, how to set up your ad campaign to help meet your business goals.
Step 1: Choose your CPM campaign settings
Sign in to your EroAdvertising’s account.
- If you’ve already created a CPM campaign in your account, click the Campaigns tab, then click the pencil icon, to edit the CPM campaign settings;
- If you have an EroAdvertising’s account but haven’t created a CPM campaign yet, click the Campaigns tab. Then, proceed to the next step.
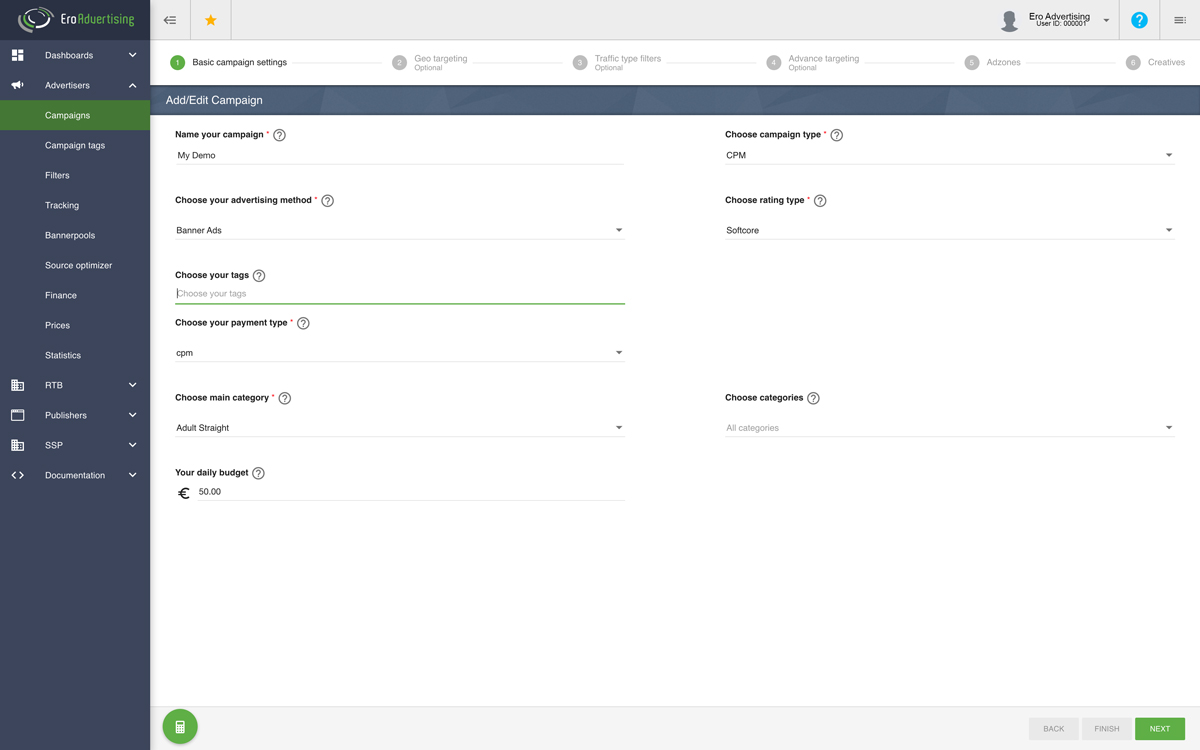
In your basic ad campaign settings, give your CPM campaign a name.
Note: that this field is only editable when at least one CPM campaign is selected.
Campaign type
From the drop-down menu, select CPM (cost per mille) (recommended to generate brand awareness).

Note: Campaign types cannot be changed once the ad campaign has been created and posted.
Advertising method
Select the advertising method type you want to use. Most advertisers use “banner ads” (recommended to generate high volumes of traffic), ” pop ads,” or “redirect ads”, though other ad campaign types are available.
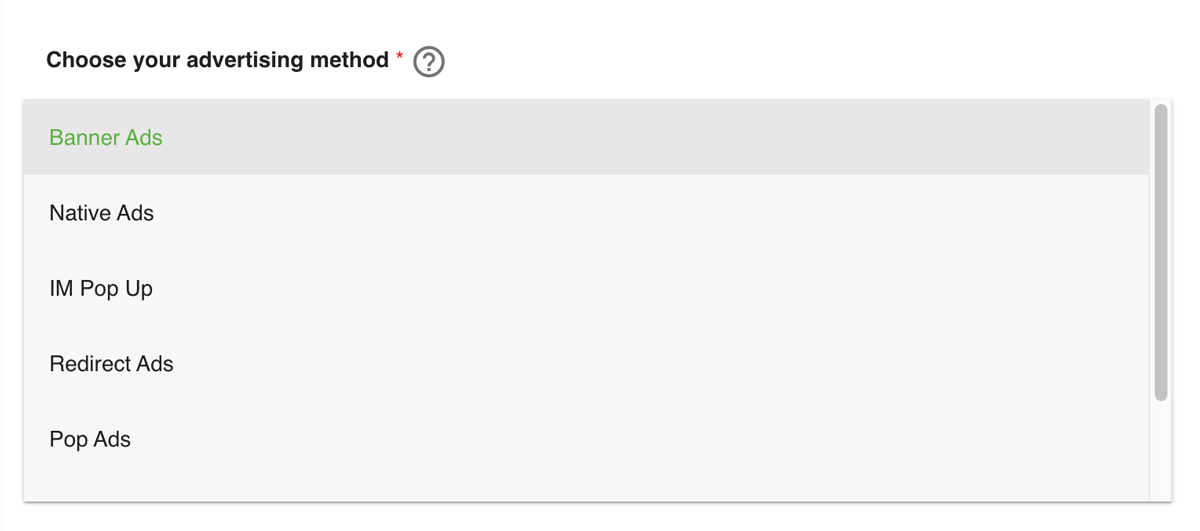
Note: Advertising types cannot be changed once the ad campaign has been created and posted. Learn more about choosing your advertising type.
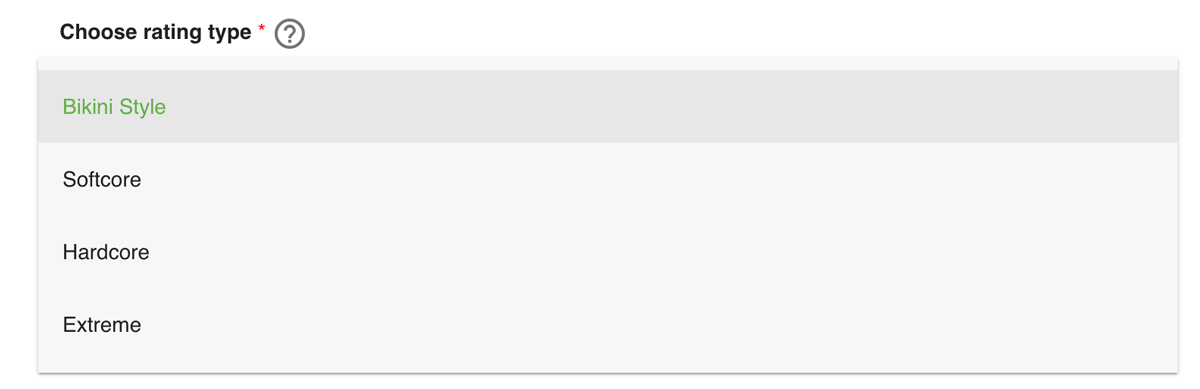
Rating type
Select the rating type you want to use. Most advertisers use “softcore” or “hardcore” recommended to generate high volumes of traffic), though other rating types are available. Learn more about choosing your rating type.
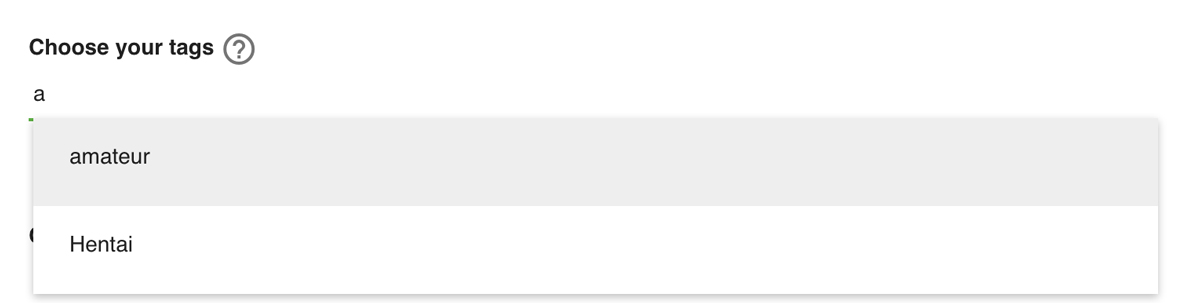
Campaign Tags
Choose your campaign tags (optional) you want to use. Learn more about choosing your campaign tags.
Payment type
Select the payment type you want to use. Learn more about choosing your payment type.
CPM: The amount an advertiser pays for one thousand advertisement impressions, regardless of the consumer’s subsequent actions.

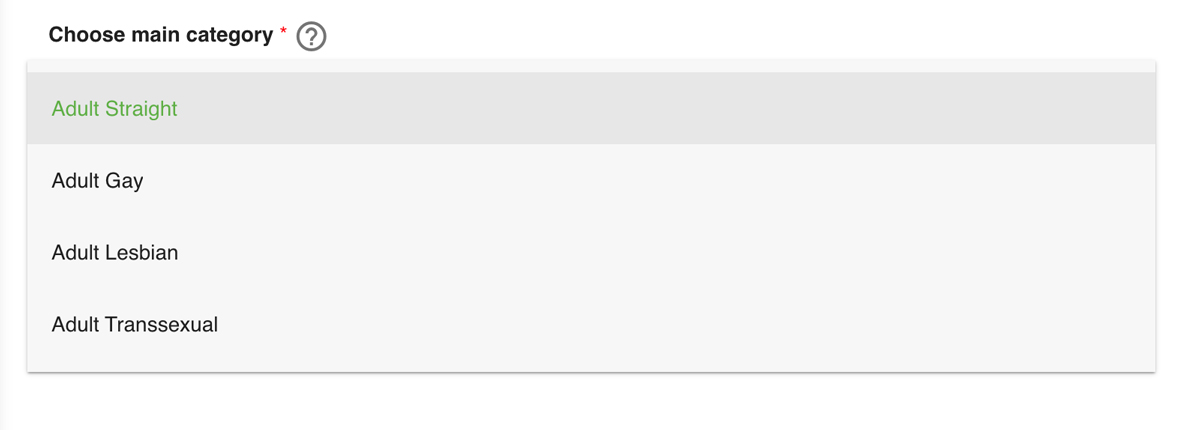
Main Category
Select the main category you want to use. Learn more about choosing your main category
Categories
Select the categories you want to use. Learn more about choosing your categories.

Daily budget
Enter a daily budget, you can set your daily budget to a specific amount. Learn more about choosing your daily budget.

Click Next to continue with the Geo-targeting.
Step 2: Choose your Geo-targeting (optional)
Countries and locations
From the drop-down menu, check the boxes next to the countries, cities, and regions that you’d like to target.
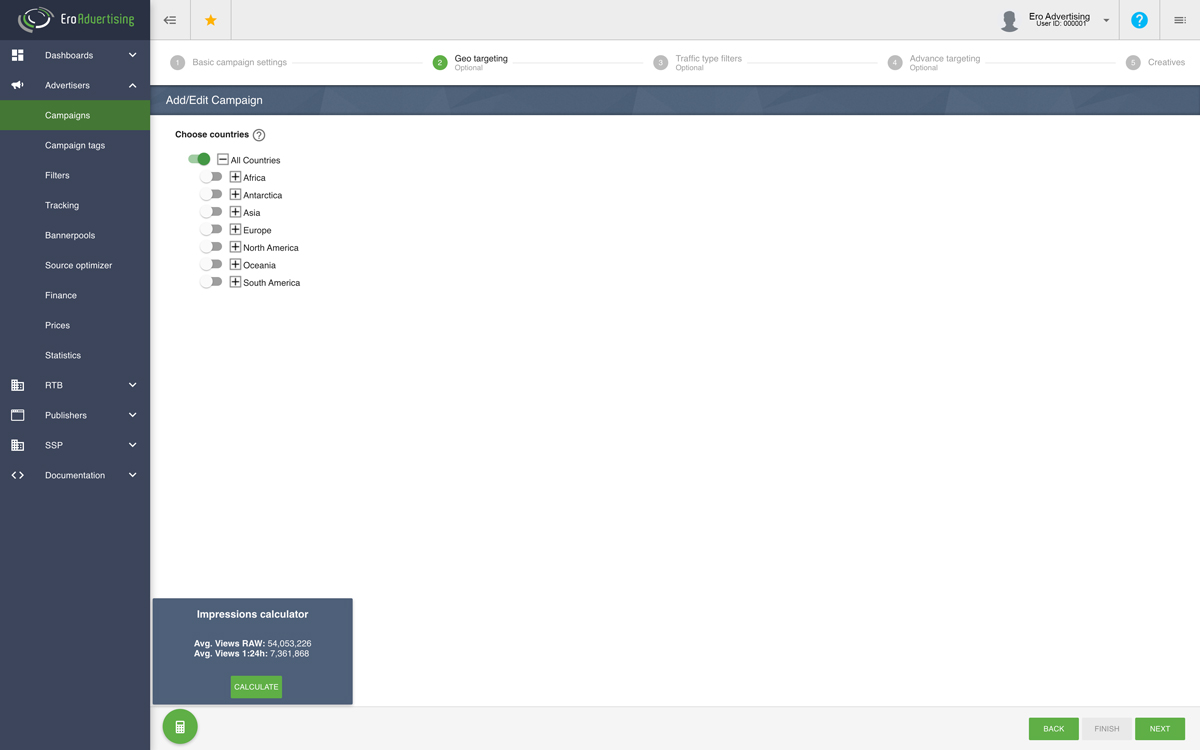
Click Next to continue with the traffic type filters.
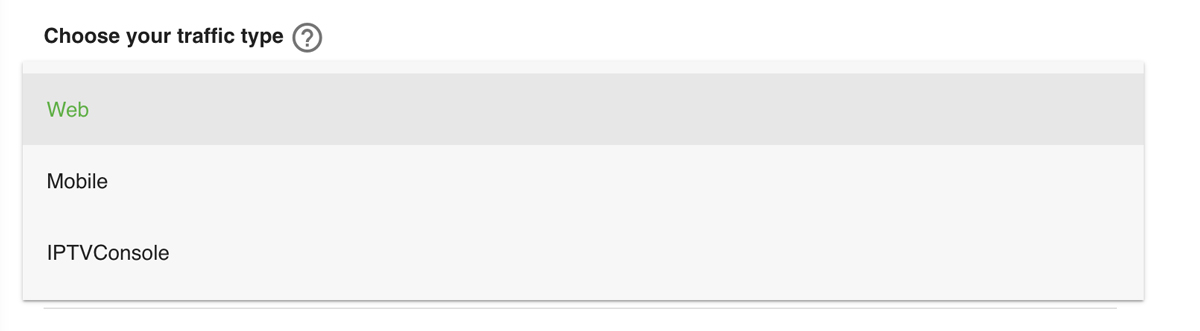
Step 3: Choose your traffic type filters settings (optional)
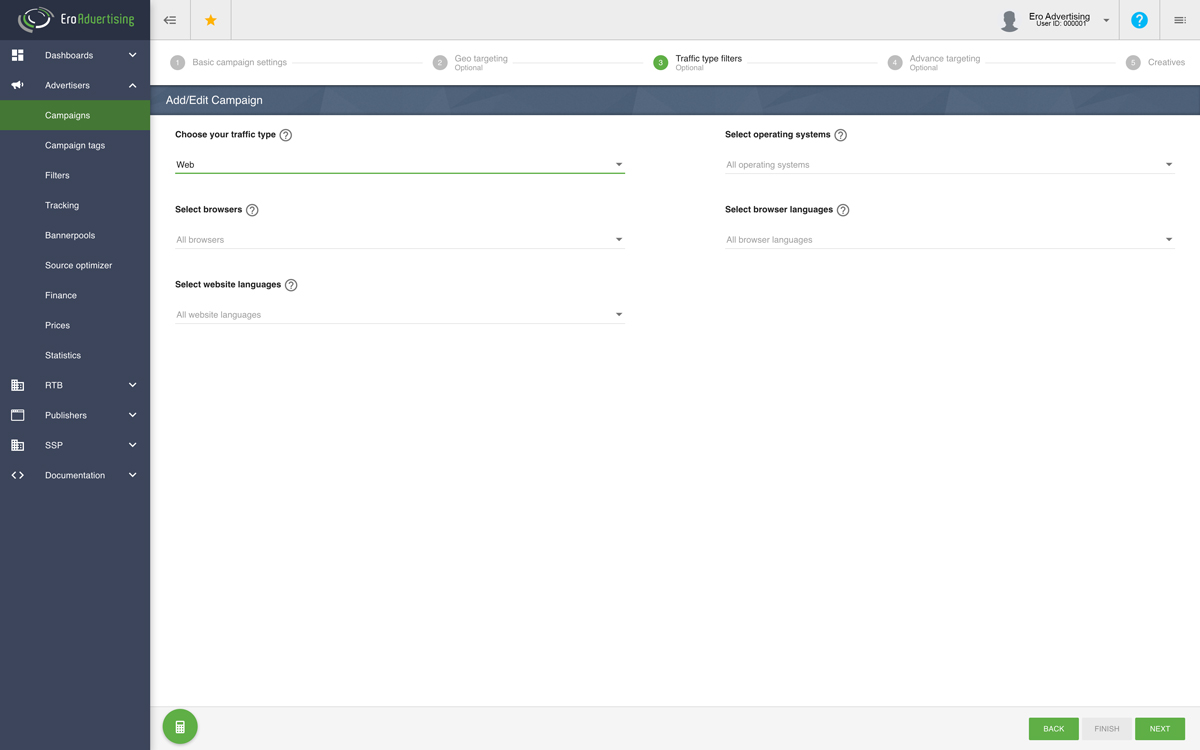
Traffic type filters
From the drop-down menu, select the traffic type (required) you want to use.
Check the boxes next to the operating systems, browser targeting and website languages that you’d like to target when your traffic type is set to “Web”.
However, when you’ve set the traffic type to Mobile or IPTV Console more settings like mobile devices, tablets, and connection types will be shown.
After you choose the rest of your traffic type filter settings, click Next to continue with the advanced settings (Optional).
Step 4: Choose your advanced settings (optional)
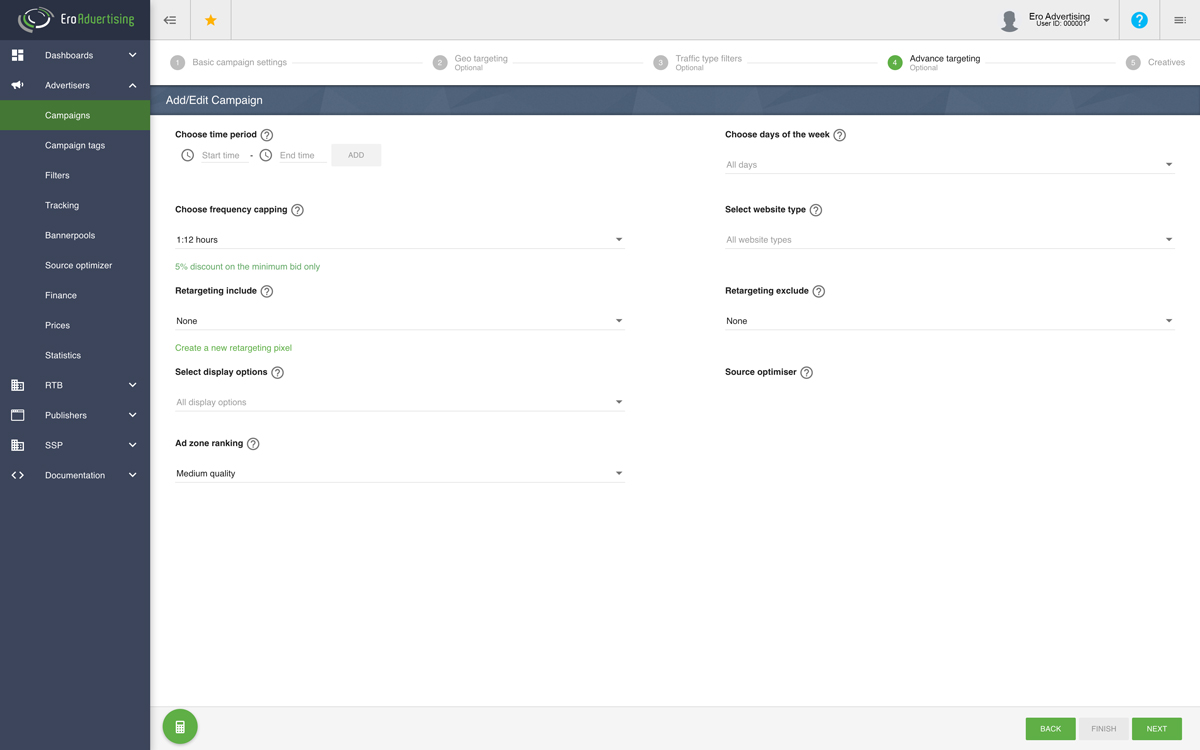
Time periods
Check the boxes next to the time periods that you’d like to target or enter one or more custom time periods. Learn more about choosing your time period(s).

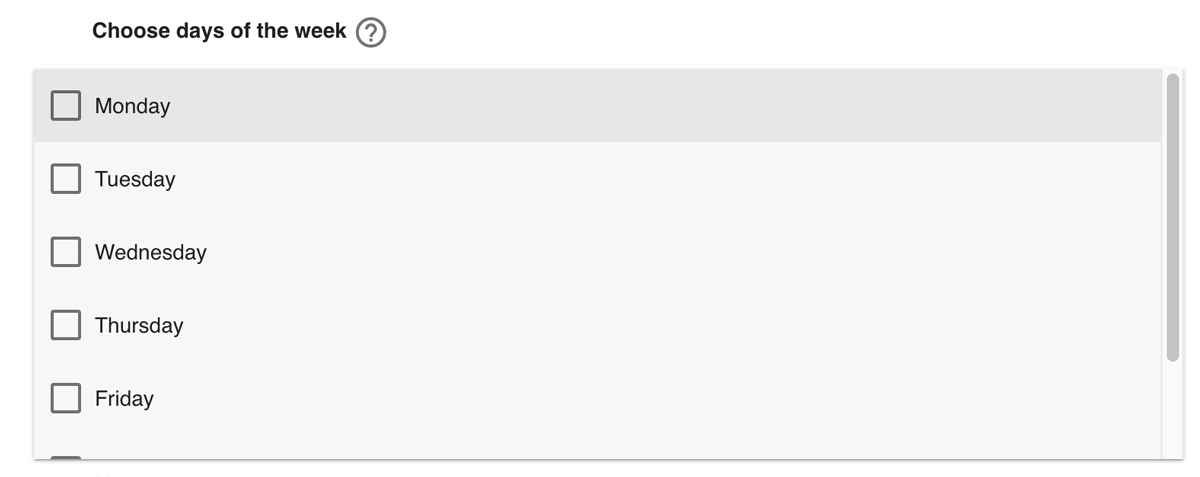
Days of the week
Check the boxes next to the days of the week that you’d like to target or enter one or more custom days.
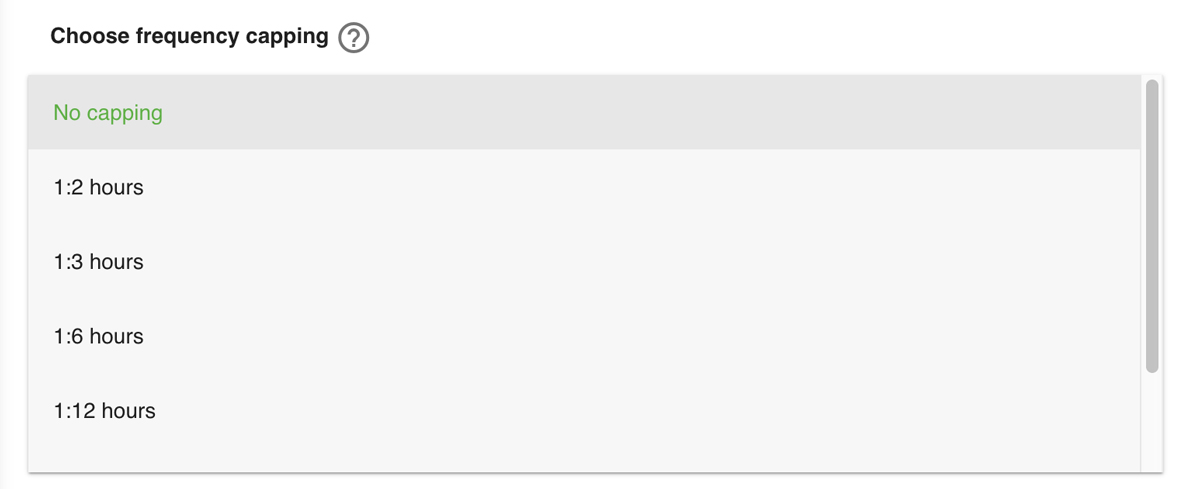
Frequency capping
Select the frequency capping you want to use. Most advertisers use “1:12 hours” (recommended to generate high volumes of traffic), though other rating types are available. Learn more about choosing your frequency capping.
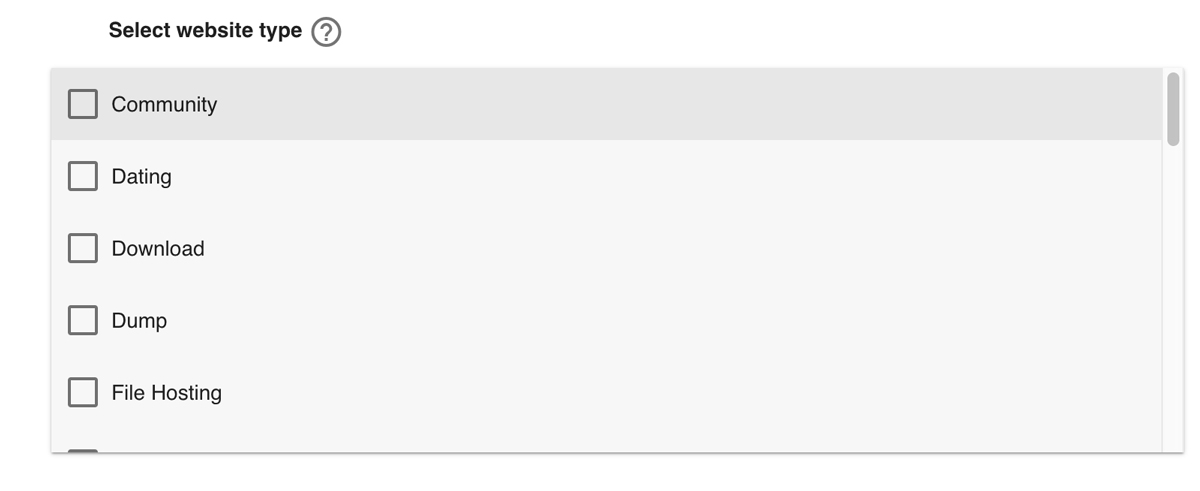
Website type
Check the boxes next to the website types that you’d like to target. Learn more about choosing your website types.
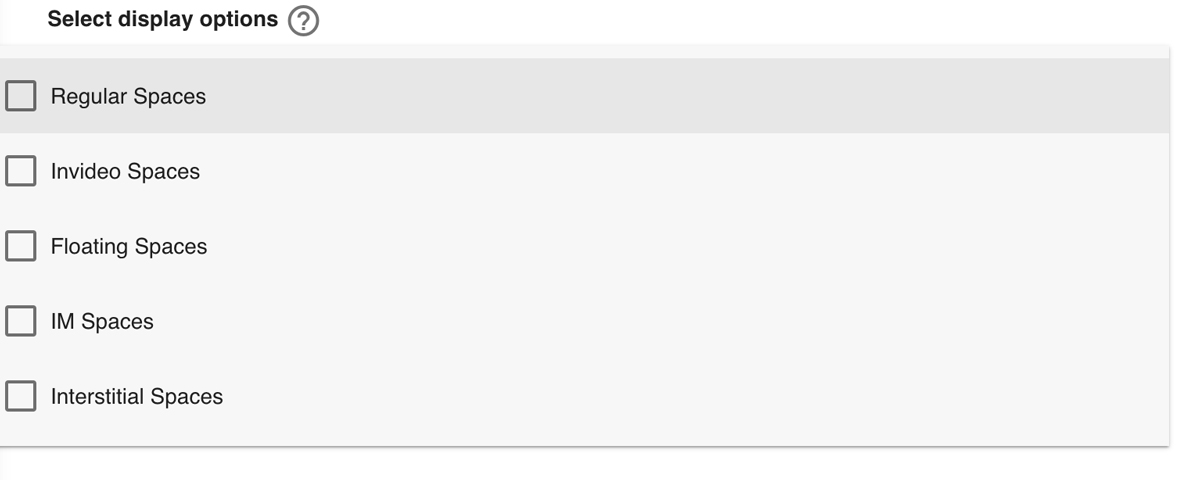
Display type
Check the boxes next to the display options types that you’d like to target. Learn more about choosing your display types.
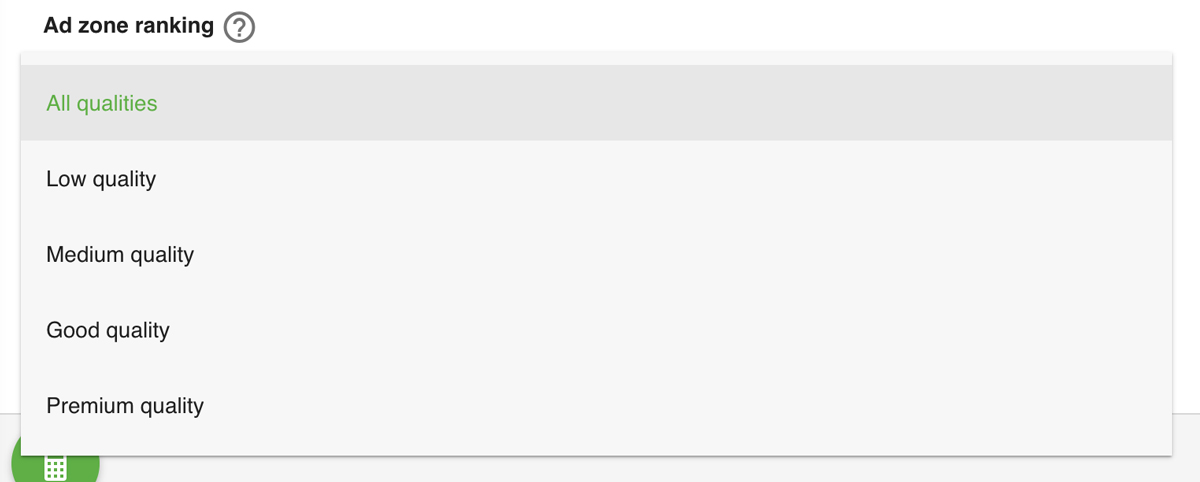
Ad zone ranking
Select the ad zone ranking you want to use. Most advertisers use “medium quality” (recommended to generate high volumes of traffic), though other rating types are available. Learn more about choosing your ad zone ranking.
Click Next to continue with the add ad zone (required).
Step 5: Choose your ad zones.
Click on the “Add Ad zone” button, to add one or multiple ad zones.

In the pop-up window, the search field allows you to tailor search results to specific size ranges, impressions and more to make it easier to find specific ad zones. In addition, you can type in your search query at least 3 characters to find any ad zone. Learn more about choosing your ad zones.
Ad Zones
Click the search button to get an overview of all ad zones. Check the boxes next to the displayed ad zones types that you’d like to target. Click on the “+” mark or the “Add All Selected” button to add the ad zones to your ad campaign.
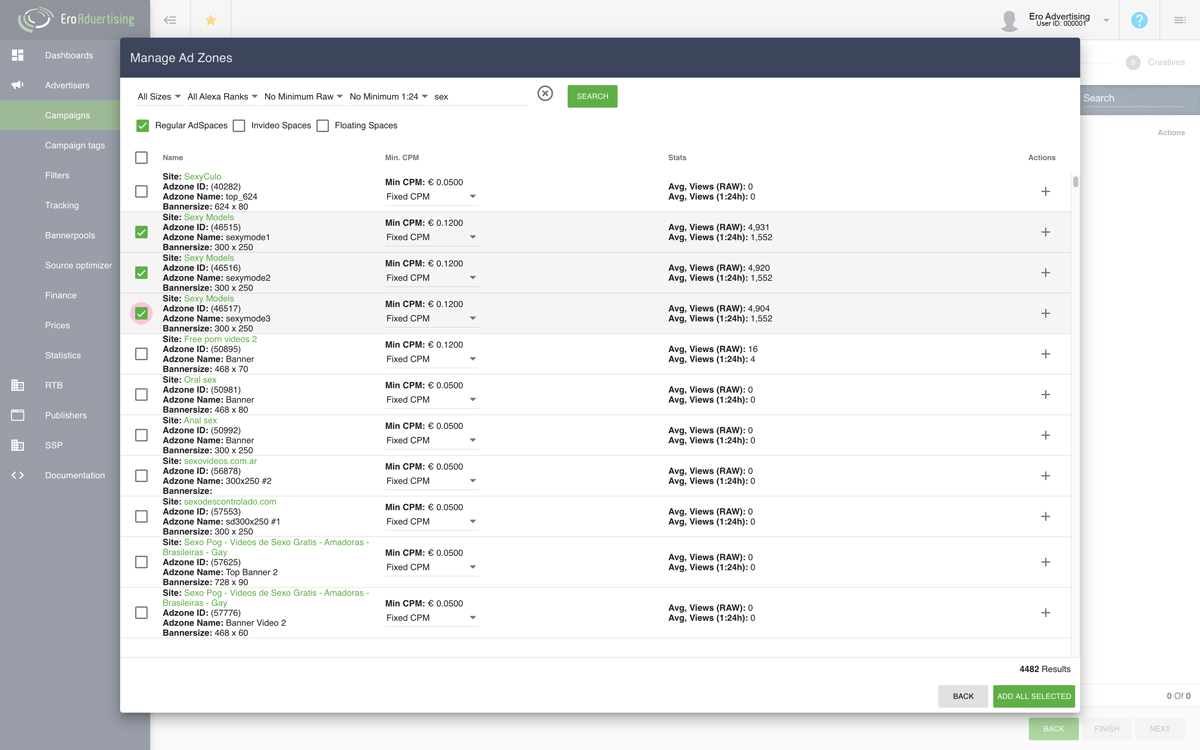
The selected ad zone(s) will be added to your CPM ad campaign.
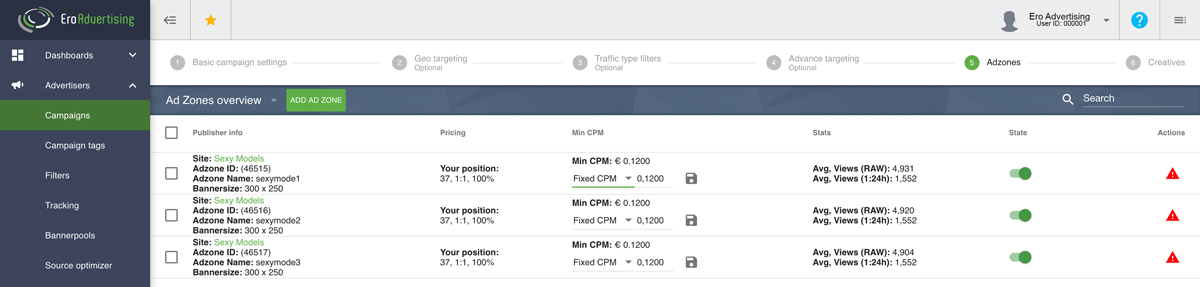
Click Next to continue to add your creatives (required).
Step 6: Add your creatives
Click the “Upload a New Creative” button. In your creative settings, give your creative a name, description and some keywords. Note: The name field is only editable when a campaign is selected. The creative settings are based on the advertising method type that is chosen in step 1.
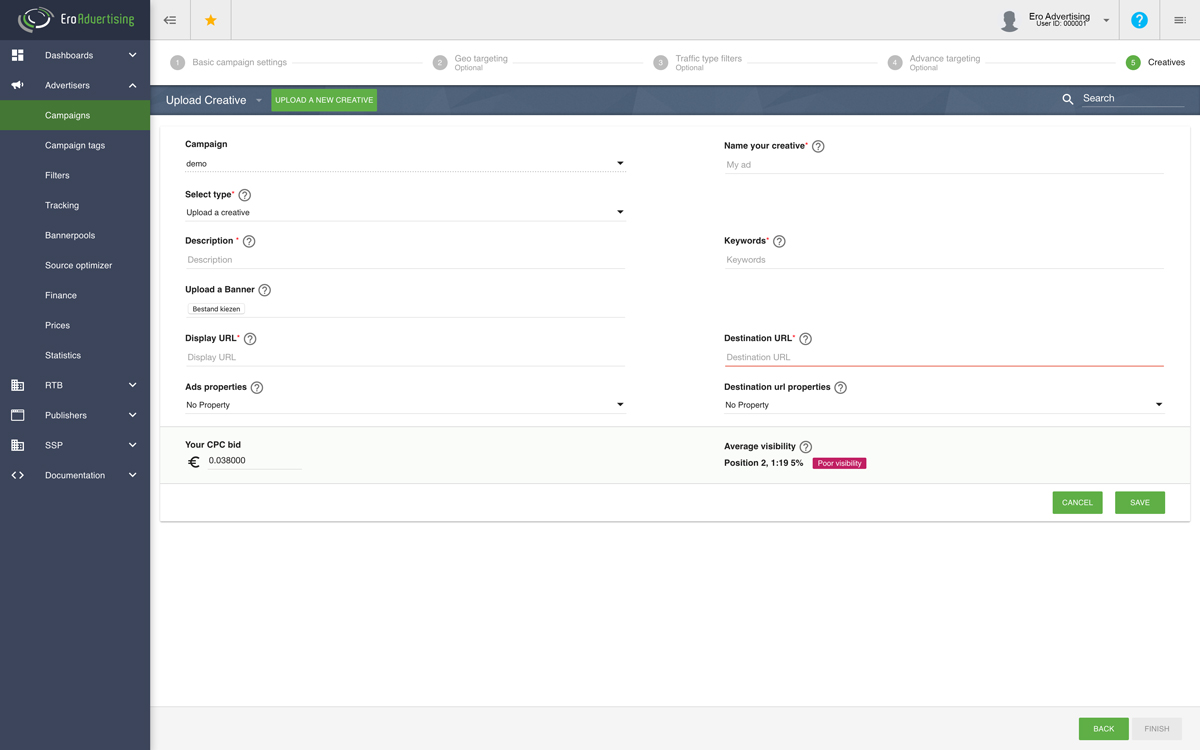
Banner type
Select the banner type you want to use. You can choose “Upload a Creative”, Upload an iFrame tag” or “Upload from the banner pool“. banner types can be changed once the campaign has been created and posted. Learn more about choosing your banner type.

The banner file upload button allows you to upload a file from your computer to the ad server.

Banner size
Select the banner size you want to use. Most advertisers use “300×250” (recommended to generate high volumes of traffic), though other banner sizes are available. Banner sizes can be changed once the campaign has been created and posted. After you’ve edited an ad, it’ll be reviewed by the Customer Service Support team before we start running it. Learn more about choosing your banner sizes.
Display URL
Enter a display URL. Learn more about choosing your display URL.

Select HyperText Transfer Protocol (HTTP) or the secure version (HTTPS) and enter a destination URL.
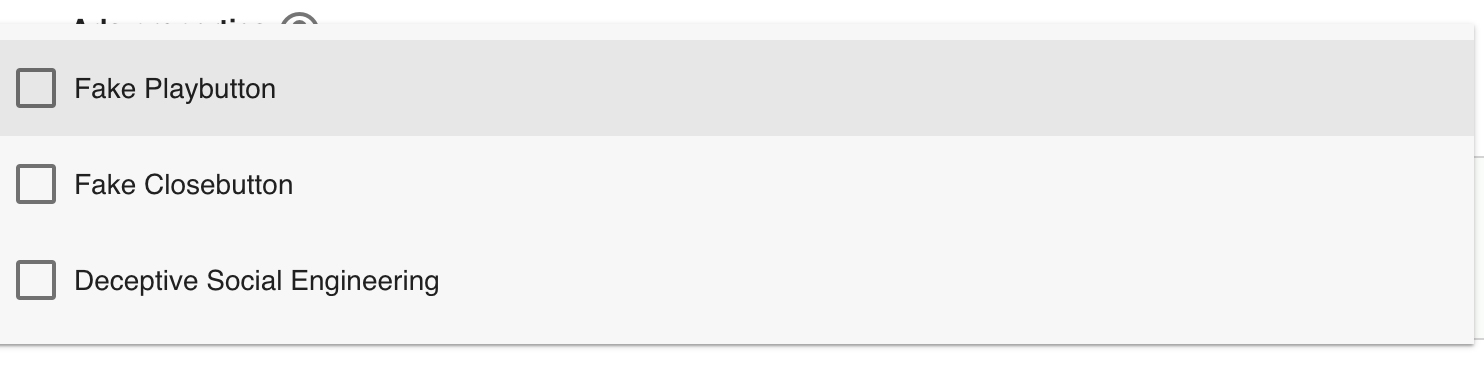
Ad properties
Check the boxes next to the ad properties that apply to your banner. Learn more about choosing your ad properties.
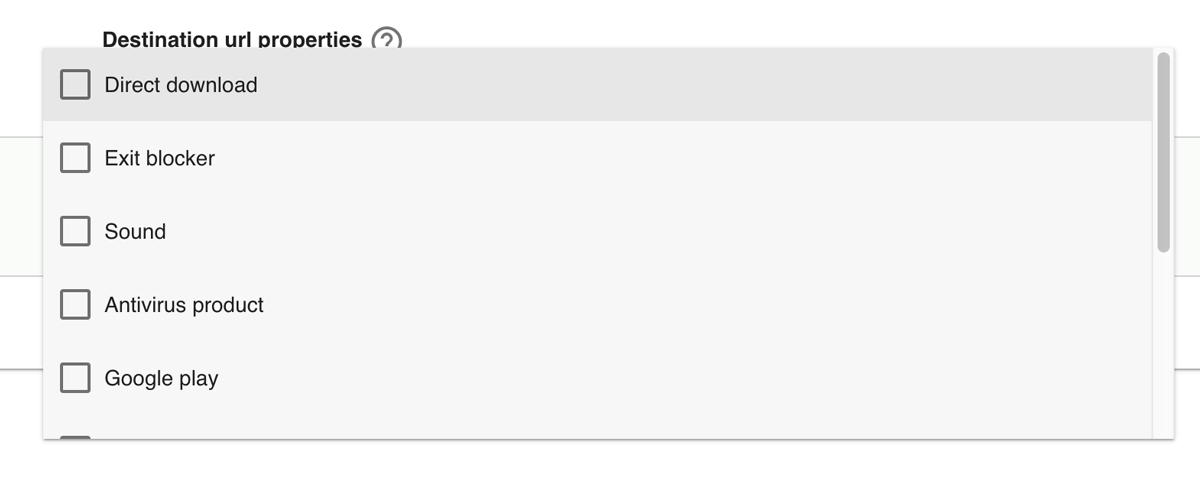
URL properties
Check the boxes next to the URL properties that apply to your destination URL.
Continue to choose your bid strategy.

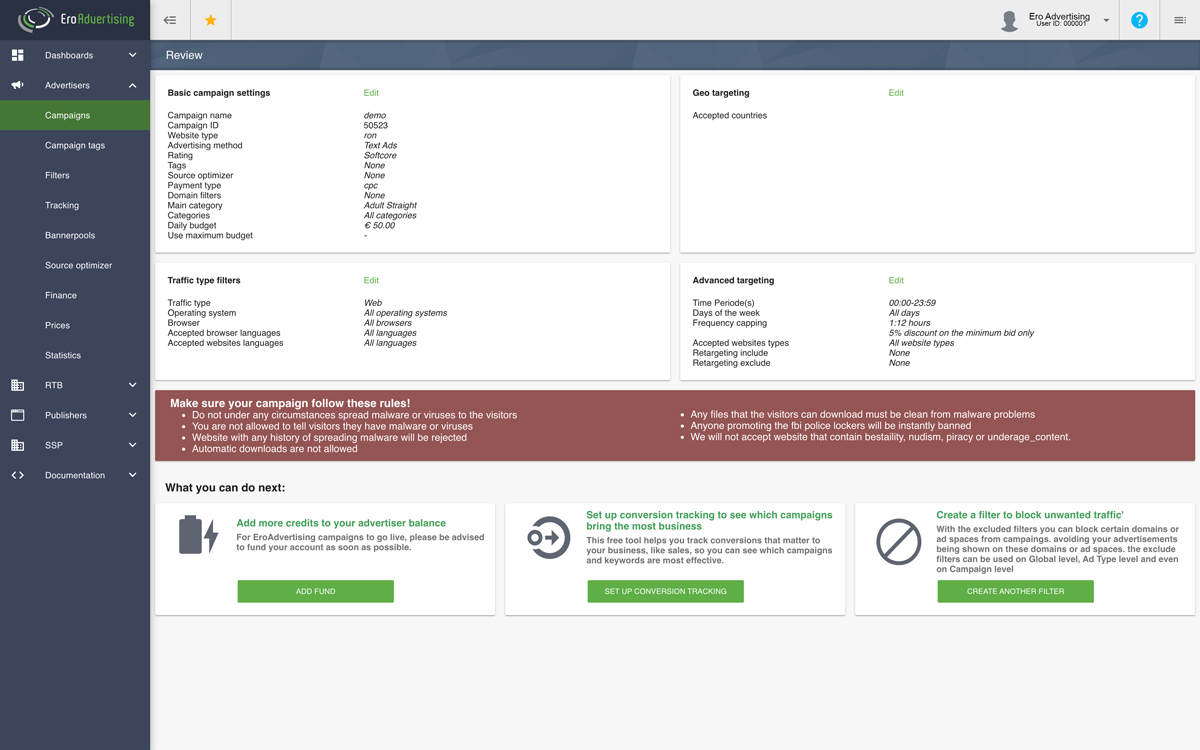
Click Save settings and click the “Finish” button to review your campaign settings.
Tip: If you’ve already set up a similar campaign and you want to use the same settings, you can save time by cloning the existing campaign from the “Edit” drop-down menu on the “Campaigns” tab. Just check the box next to the campaign you want to clone, select “Clone” from the “Edit” drop-down.
Have additional questions? Reach out to our friendly support team at support@eroadvertising.com


