")
The most exciting publisher tool we ever offered.
The first step to getting faster ad load time and a build-in anti-ad blocker on your site is to create and implement our EroAdsController or eaCtrl feature.
At the end of this step by step guide, you will be able to set up and install your EroAdsController.
This article explains how to create and install EroAdsController.
Note: the information in this section can be highly technical in nature so you may want to ask somebody technical to help you with the instructions. Learn more about the eaCtrl documentation
Before you begin
Learn about the different advertising types and understand your ad zone settings so you know how to create ad zones for your EroAdsController.
Next steps
- Create your own EroAdsController.
- Download the zip-file with all files.
- Implement the eaCtrl code on your website.
Choose your eaCtrl settings.
Instructions
Sign in to your EroAdvertising’s account.
If you have an EroAdvertising’s account but haven’t created an EroAdsController in your account yet, click the eaCtrl tab then proceed to the next step.
Click the “Create Adcontroller” button.
Title
In your eaCtrl settings, give your eaCtrl a title/name.
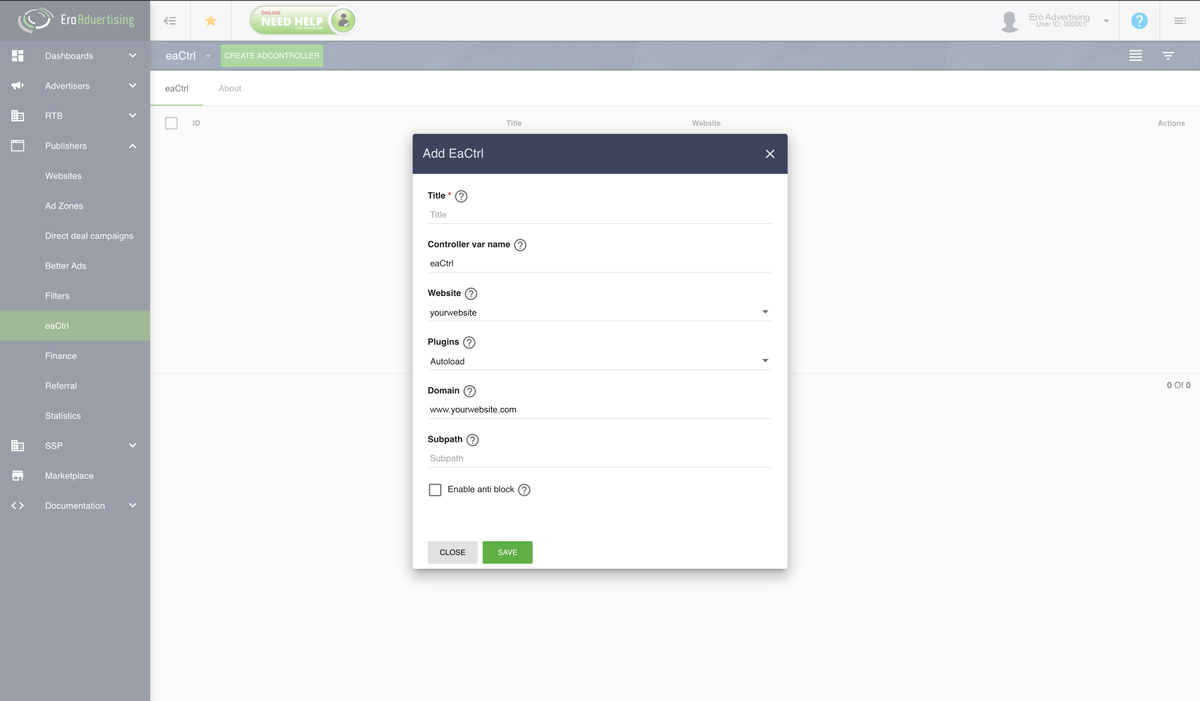
Controller var name
You can keep the default name “eaCtrl” (recommend).
Website
From the drop-down menu, select your registered website.
Plugins
From the drop-down menu, select how you want to load the eaCtrl plugins. You can choose between Autoload (recommend) or Embed. Autoload is the best way to keep the plugins up-to-date.
Domain
Add your site URL in the domain field.
Subpath
Leave this option blank if it isn’t being used (recommend).
Click Save or continue by enabling the anti-ad block options.
Anti-ad block
With this option enabled, we can bypass Adblockers and still serve ads on your website. All you need is a proxy, which will be used to get the ad data to your website.
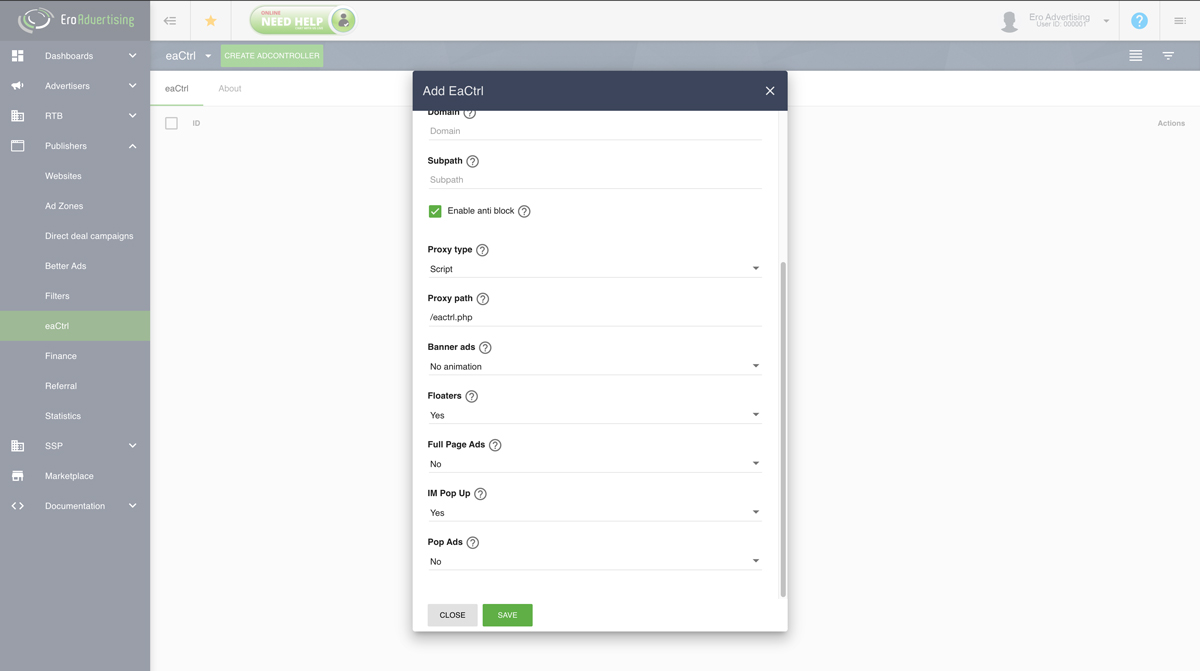
Proxy type
From the drop-down menu, select your proxy type. We do recommend to use the default (PHP) script. Learn more about the available proxy types.
Available proxy types
- (PHP) script (recommend)
- Rewrite Url (.htaccess or Nginx proxy)
- Own proxy service like Cloudflare “path” or domain rewrite
Proxy path
You can keep the default path “/eactrl.php” (recommend).
Ad restrictions
Banners
From the drop-down menu, select whether you want to enable an anti-ad block for animated or only static banners.
Floaters
From the drop-down menu, select whether you want to enable floaters, IM Pop Up or Pop ads.
Click Save and close your eaCtrl settings window
Downloading the eaCtrl zip file.
We have generated a ZIP-file for you with the following files:
- Controller file: eaCtrl.js
- Proxy script (PHP): eaCtrl.php
- Test page with all supported ad zones of your connected site: ctrltest.html
Select one of your EroAdsController(s) and click on the download icon to download the ZIP-file.
Implement the EroAdsController on your website.
Before you start to upload the files or unzip the ZIP-file to the root of your website make sure everything is working properly.
Unzip the file on your computer and open the test page: ctrltest.html in an editor and check if all paths are correctly set.
View the test page: ctrltest.html in your browser and check if the ads are loading. If the ads are loading properly then you can start to implement the controller at the root of your website.
Upload or unzip the following files in the root of your website
- www.yourwebsite.com/eactrl.php
- www.yourwebsite.com/eactrl.js
- test page: ctrltest.html (optional)
note: The test page: ctrltest.html contains all supported ad zones which you can copy and paste into your page. However, there are more functionalities and options, which are described in our eaCtrl documentation. Learn more about the eaCtrl documentation
Copy your codes.
Great. You are almost done. All that remains is to copy & paste the JS code, which you can find in the header section of the test page: ctrltest.html.
Open once again the test page: ctrltest.html in an editor and copy the code between the <head></head> tags and paste this code somewhere into your own page. just after the “init” call or you can add all javascript in one file.
Repeat the previous step with the ad zone example codes from the ctrltest.html and place the code into your page where you wanna load your ads.
Have additional questions? Reach out to our friendly support team at support@eroadvertising.com


